This is one of my first attempts to make homemade bread without a bread machine. It worked! In the several years, since I posted this recipe, I have come a long way in learning how to bake bread. Honestly, now that I own a Kitchen Aid Stand Mixer, I don’t find it necessary to have a bread machine (mine broke, actually). I think this is a good recipe for beginners.

 When I first posted this recipe, I was far from being a master baker of bread. In the meantime, I’ve learned a few simple tricks that have yielded pretty decent bread. I will admit, though, that I no longer use a bread machine. Mine broke, and that’s when I realized how easy it is to use my Kitchen Aid Stand mixer. Unlike some true bread baking experts, I don’t particularly want to knead my dough by hand!
Anyway, let’s start with the bread. I used a recipe that has never failed me over several years:
Honey Wheat Bread: Besides my Kitchen Aid Stand Mixer, and the dough hook, I use a “Dough Doubler“. Let me save you some money– you can buy these at King Arthur Flour’s website, like I did. Or, you can find out that most restaurant supply stores sells these buckets. They’re what restaurants and caterers use to prep, store and tote ingredients in. That way, I no longer have to dig out a big bowl and bother with using plastic wrap. I recently read that a shower cap works great. I’m getting ahead of myself, again–
I preheat my oven to 250F for a couple minutes, then turn it off. This makes a nice draft-free place for me to let my dough rise.
I use Bread Machine rapid rise yeast, by the way. There are all kinds of yeasts, but I’ll stick to the basics (and that’s about all that I know anyway).
NOTE: Since writing this post, I’ve also bonded with SAF Instant yeast. Works great, and you don’t have to proof it!
 To begin, I added sugar and the yeast to warm water and set that aside. Next, I added the evaporated milk, water and whole wheat flour (I use King Arthur flour, by the way). I let the stand mixer do the work, and let it rest for 15 minutes…and, as usual, I cleaned up the mess and got the oven warmed.
 Next, I added the unbleached white flour and let the KA mixer do all the kneading for about 5 minutes.
 I like to use a light layer of olive oil, and then I placed the dough and turned it to coat. That’s when my husband said he was going to hit the jacuzzi, and I decided to join him.
 45 minutes later, I was ready to gently “punch” the dough.
 My kitchen is not much larger than a postage stamp, so this is what works well for me:
I place a wet dish cloth on top of my cutting board, to keep things from slipping around. Then I place one of my nifty plastic cutting mats on top, sprinkle some flour and that’s where I fold the dough and work out the bubbles (and say a little prayer). I love my bench scraper (or whatever you might call it) for so many things. Here, I like to cut the dough in half.
 Here’s where I wish I had saved those shower caps from hotel rooms! I used plastic wrap and put these back into the oven for the second rise– 30 minutes.
I removed them before preheating the oven (obviously) and filled a small pan with water and set it on the very bottom rack. I read that this helps to make “steam”. True or not, I find that my bread turns out moister, so that’s my story and I’m stickin’ to it!
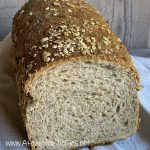
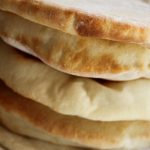
 There is nothing like the smell of fresh baked bread, is there? Well, maybe cinnamon rolls, but home baked bread is so good!
 Now let me introduce you to a gadget that I have owned for years. These aren’t sold any longer, as far as I know. I’ve seen people on eBay, bidding furiously for these– mine is not for sale:
 How cool is that?! Want to see it again?

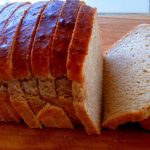
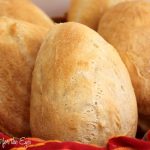
The slicing guides are in different colors, so that I match the electric knife in perfect alignment! That’s how these slices look so perfect:
I am happy to report that this bread is a winner!
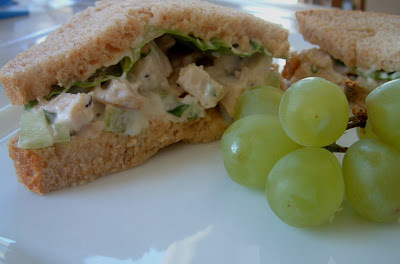
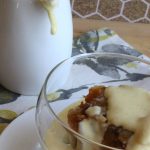
 Right about now, I can feel the men anxiously waiting for lunch. I got to working fast, making a chicken salad… a little more mayo, some lettuce…. here! Lunch is ready:
 I actually didn’t eat one of these. I’m not a HUGE fan of mayonnaise. The boys loved it.
Me? Somebody has to eat the “heel” of the bread.
 This is delicious bread! I hope that you try it.
Homemade Honey Whole Wheat Bread
Ingredients
- 1 .25-ounce package rapid rise yeast
- 1 teaspoon white sugar
- 1/2 cup warm water 110°F/45°C
- 1 can evaporated milk 12-fluid ounce can
- 1/4 cup water
- 1/4 cup butter melted
- 1/4 cup honey
- 2 teaspoons salt
- 2 cups whole wheat flour
- 3 cups bread flour
- 2 tablespoons butter
Instructions
- Dissolve yeast and sugar in 1/2 cup warm water.
- Combine milk, 1/4 cup water, butter, honey, salt and wheat flour in food processor or bowl. Mix in yeast mixture, and let rest 15 minutes.
- Add white flour, and process until dough forms a ball.
- Knead dough by processing an additional 5 minutes, if using a Kitchen Aid Stand Mixer. Or mix and knead, by hand, 10 minutes.
- Place the dough in a oiled bowl, and turn to coat. Cover the bowl with plastic wrap. (Note: I use a dough bucket, with lid.)
- If you desire, I preheat the oven to 250°F for just a minute or two, then turn it off. This creates a warm area to help the dough to rise, if your kitchen is cold.
- Let dough rise for 45 minutes, or until almost doubled.
- Gently punch down, and divide dough in half.
- Roll out each half, and work out the bubbles.
- Form into loaves, and place in buttered 9×5 inch bread pans.
- Let rise in a warm area until doubled; second rise should take about 30 minutes.
- Place a small pan of water on the bottom shelf of the oven. (optional)
- Preheat oven to 375°F (190°C).
- Bake for 25 to 35 minutes, or until tops are dark golden brown. Butter crusts while warm. Slice when cool.


I LOVE THAT BREAD!! Wow, Debby, you have me hooked on taking some time to try this! I am glad you dont have to knead, I hate kneading, only because I can not master the skill. Honestly, the bread looks unbelievable.
Chicken salad sandwiches must be one of the greatest comfort foods of all times. And I just love that you made your own bread. It looks totally delicious. By the way, you’ve made me want to invest in one of those “doublers.” What a great idea!
Deb,
Your bread is gorgeous.
Barefoot’s chicken salad is very good. NO CRANBERRIES please!
I sometimes add red grapes and walnuts, but that’s as far as I go.
and yes, scallions! a lot of them!
Oh wow – your bread looks amazing! Way better than the wonder bread I’m looking at right now.
That bread looks lovely! Thanks for the Williams-Sonoma tip on finding more Tupelo, as well. I’ve got to run over to the DMC to grab some lamb from Whole Foods soon anyways, might as well stop there too…
So ambitious to make your bread…but it looks so worth the extra effort. Bet it would be so good toasted, too.
That’s some gorgeous bread! Tasty way to use up the leftover chicken, I always make these sandwiches for my hubby with leftovers too :).
Your bread slicer is genius! I want one!
I just watched this episode. But I thought she always put tarragon in it. It’s liste din the ingredient list in her older cookbook???? EIther way, it looks great and so does that bread!
What amazing bread! I am still struggling with getting it right in my KitchenAid mixer – my biggest issue is finding the right spot where the bread can rise.
I have been looking for a great wheat bread recipe…I can’t wait to try this one. Your loaves look beautiful!
How delicious. I adore chicken salad sandwiches. You inspire me to bake bread this weekend. Thanks!!
Just found your site! Congrats on fabulous looking bread! I particularly like the ‘dough doubler’ I think I can find it at Sam’s Club.
Also, I have the bread slicer guide! Sadly,I don’t think they make it anymore…*sigh*
Looking forward to more posts!
Love your commentary, so hilarious! I just saw Ina's recipe for this chicken and made it sunday…. and now will make a sandwich from it because of you! Thank you!
I love honey in bread. It turns out so yummy! I also love a simple chicken salad. Not how the new wave is adding nuts and cranberries. Keeping it simple is my favorite. I am on a kick to make my own bread. We go through so much in my house. My mom always made her own so I guess I should to! Thank you for sharing!
Warmest Regards,
Annamaria
Just made this and let me just say that we've already eaten half of one loaf! So, so good! I made just a few ingredient swaps for our needs: subbed unsweetened vanilla almond milk for the condensed milk and used coconut oil instead of the shortening. The texture and flavor is out of this world! Moist and fluffy on the inside while a slight crispness to the crust. Will definitely make this again!! Thanks for the recipe!!
That should be for the evaporated milk, not condensed milk. Sorry about that 🙂
Well, those are some interesting adaptations and I'm sooooooo glad they worked for you. I was just thinking about making a loaf of this again. Thanks for letting me know.
Debby